|
- Two sets of thirteen bells from Middle C to High C (From Do to Do of the chromatic scale.)
- Set 1: With eight white and five black stands:
- The bells are of decreasing diameters or of the same diameter.
- On the stand of each bell there is the name of the note.
- On the black stand there is a double name e.g. C# D6 (Do# Re6)
- Set 2: The stands of all thirteen bells are varnished
- The bells are of the same diameter.
- There is no name of the note on the stand.
(The example below shows some of the bells with the white, black, and varnished stands.)
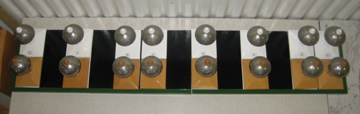
- The bells with the white stands are referred to as the “white bells”, the ones with the black stands as “black bells”, and the ones with the varnish stand as the “varnished bells”.
- The bells are placed on a board divided into 8 white and 5 gray spaces corresponding to the black and white notes on a piano.
- The bells with the white stands are placed on the white spaces and the ones with the black stands on the gray spaces.
- The varnished ones are on the white spaces in front of the “white bells”.
- The five “varnished bells” are kept on the lower shelf of the table on which the board and bells are arranged.
- A wooden hammer – the mallet
- A flat piece of wood with one end covered in felt – the damper
Before each presentation, play up and down the scale to check the bells. Invite the child to come and work with you. Bring him over to the bells and tell him that you will be showing him how to work with the bells. (Depending of which presentation you will be showing, you can be more specific in telling the child what you will be doing that day with the bells.)
- Stand in front of the white and varnished bells.
- Tell the child that you will show him how to carry the bells.
- Hold the stand of one of the varnished bells in one hand and place the other hand flat under the base.
- Carrying the bell, walk a little distance away from the bells and place it on another table.
- Have the child carry the bell in the same manner and place it back near the other bells but in front of the others.
- Show the child how to hold the mallet lightly between your fingertips and how to gently strike the bell on its lower edge.
- Tell the child that you will strike the bell and you will both listen to the sound until it is completely gone.
- Listen until the sound is completely gone.
- Have the child strike the bell and listen until the sound is completely gone.
- You can then strike all of the bells in isolation.
- The child can then work with carrying and striking the bells in isolation.
- Take out three of the varnished bells of contrast (e.g. Middle C, F, B).
- Mix them and place them in a row on the table in front of the white bells.
- Move one of the white bells forward.
- Place one of the varnished bells in front of the white bell.
- Strike the white bell and listen.
- Then strike the varnished bell and listen.
- If the varnished bell doesn’t match the white bell, place it at the end of the row of varnished bells, keeping a little distance to show what bells you have striked and what bells you have not striked.
- Move the next varnished bell in front of the white bell and see if they match.
- Repeat until you have found the correct match for this first white bell.
- Once you have found a match, move the white bell back and place the varnished bell directly in front of it.
- Repeat for the other two white bells until all bells have been matched.
- Then check all of the bells to make sure they are in the correct order.
- Invite the child to match three bells of contrast.
- Tell the children, “I am going to play up the scale.”
- Play the varnished bells from Middle C to C (so up the scale).
- Repeat.
- Then tell the children, “I am going to play down the scale.”
- Play down the scale and repeat.
- Repeat playing up and down the scale but have the children use their hands to mimic going up or down the scale. (Act out each note: As the notes get higher, raise your hand a little up. As the notes go down, lower your hand a little for each note.)
- Once this is clear to the children, you can play notes at random, having the children raise or lower their hands if the note is high or low.
- You can then do a Three Period lesson with the language for Low and High.
1 Take out all of the varnished bells and mix them.
Place them in a row.
Strike Middle C (the white bell) and find its match as for Presentation B.
Once you have found the match, strike Middle C (the varnished bell).
Find D and place it in front of its white counterpart.
Then strike Middle C and D (of the varnished bells).
Find E and place it in front of its white counterpart.
Repeat in this fashion by always striking all of the varnished bells that come before the bell you are looking for, until all of the white bells have been matched.
2 Take out all of the varnished bells and mix them.
Place them in a row.
Strike Middle C (the white bell) and find its match as above.
Once the match has been found, strike Middle C and find D.
Then, strike only D (of the varnished bells) to find E.
Repeat for all of the varnished bells in this fashion.
(For example: only strike the varnished bell that comes before the one you are looking for. Strike E to find F, etc.)
3 Take out all of the varnished bells and mix them.
Place them in a row.
Strike the first varnished bell and after listening to its sound, place it in front of its correct white counterpart.
(The child will be grading but this time, he will have no other bells to guide him. The other bells will not be used as a control of error.)
Repeat until all of the varnished bells have been placed in front of its correct counterpart.
- Place the black bells and their matching varnished bells on their corresponding gray spaces between the white bells.
- Take out four varnished bells of contrast (two of the white match and two of the black match).
- Match the correct varnished bells to their white or black match as in Presentation B.
The child works individually by matching bells of contrast.
The child takes out all of the varnished bells and matches them to their white or black counterpart.
The child grades all of the bells as in Procedure D.
Matching from a distance:
- Normal matching
- With sound between each strike
With striking the other bells in between
- Grading at a distance:
- From an extreme
- From a midpoint
The names of the notes.
Discrimination of sound.
Preparation for Musical Education
The ability of the child to discriminate the sounds.
3 1/2 – 5 years
As stated in the Introduction, always begin any presentation by playing up the varnished bells and down the white bells. End all of the presentationsin the same way.
Share your experiences in the
|