|
- The numbers rods
- A set of cardboard or wooden cards with symbols from 1 to 10
- Floor mats
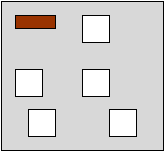
- Set the mats as in the Number Rods.
- Place a small square mat as shown in the diagram.
| Directress sits here |
 |
 |
| |
 |
Child sits here |
- Have the child set up the Number Rods on the horizontal mat.
- Place the box of cardboard cards on the square mat.
- Take out the cards and read through them with the child. After each card is read, place it randomly on the square mat.
- When you get to the 10 card, introduce it by saying that this is a new number and it represents the 10 rod.
- Ask the child to get the 10 rod, have him count it, and have him place it at the top of the empty mat. Show the child that we can represent this 10 rod with the card. Show the child how to place the card at the end of the 10 rod (and leaning up against it) as shown in the diagram.
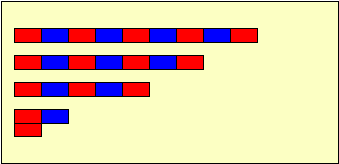
- Place one of the number cards from the square mat at the bottom of the almost empty mat and have him read it.
- Then have him choose the rod that corresponds to the number written on the card and then count the rod to check.
- If it is the correct rod, have the child place the rod on under the 10 rod and have him place the card as for the 10 rod.
- Repeat for all of the number cards. (See diagram below for the exercise done half way.)
- Collect all of the cards and lay them out randomly on the square mat.
- Have the child choose a rod, place it on the horizontal mat, say the number, count it, and then choose the correct card to go with it. Place the card as before.
- Repeat until all of the rods have been moved over to the horizontal mat.
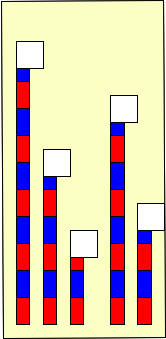
- Collect the cards and have the child build the rods in stair formation on the vertical mat. As he does so, have the child count each rod.
- As the child builds, place the cards randomly out onto the square mat.
- Have the child place each card (as in Stage A) to its corresponding rod. (Do this randomly)
- With the child, count all the cards in order from 1 – 10.
- Then, with the child, count the numbers from 10 – 1.
- Have the child put the material away.
The child works with the rods and cards as in the presentation.
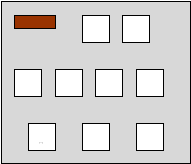
To prolong the lesson, move the mats far apart from each other
and do as in the presentation.
- Set out the number rods in stair formation mid-way down the rug.
- Take out the cards and place them randomly onto the square mat.
- Separate the 10 rod from the others by moving it up to the top of the mat.
- Have the child count it and the mark it with the appropriate card.
- Move the 9 rod up a little below the 10 rod.
- Have the child say what rod it is, count it and place the correct card.
- Tell the child, “I wonder what we could put to make this nine the same size as the ten.”
- Have the child place the 1 rod at the end of the 9 rod to make it the same length of as the 10 rod. Then place the 1 card at the end of the 1 rod.
- As you point to the numbers, say: “9 + 1 is 10.”
- Repeat this with the child.
- Repeat in the same way for the 8 rod and make it the same length as the 10 rod. Say, “8 + 2 is 10.”
- Repeat for the 7 rod and the 6 rod.
- When you get to the 5 rod, have him place the end at the far tip right side to line it up with the 10 rod and place the card at the end.
- Ask the child if we have something in the classroom that is similar to the 5 rod.
- Have the child bring over the fifth rod from the Red Rods and see if it is the same length as the 5 number rod.
- Place it to the left of the 5 number rod and notice that it makes the same length as the 10 rod.
- Replace the Red Rode back on the shelf and have the child rebuild the rods in stair formation.
- Replace the cards in the box.
The child can work as shown in the presentation.
Repeat as in Presentation 2 but this time start with the number rod 9 and have the child make 9’s. (Remove rod 10 and place it on the empty mat, out of the way.)
Note: For making 8’s, remove the 10 rod and the 9 rod.
For making 7’s, remove the 10, 9, and 8 rods.
Etc…
To be done on a day the child has made 10’s or you have asked him to make 10’s.
- Show the child the first 10 (with the 5 rod)
- Flip it over to the left side and say if we take 5 away, we have… 5.
- Look at the 6 and 4 rods.
- Ask, “Do we have another 10? … Yes!”
- “If we 10 and we take away 4 we have … 6.”
- Move the 4 rod down under the 5 rod and move the card.
- Repeat for the others.
The child can work as shown in the presentation.
To relate the symbols to the quantities that the child knows.
To introduce the sequence of the symbols.
To prepare for addition, subtraction, and multiplication.
The number of partitions on each rod acts as a guide.
4 years onwards, after the sandpaper Numerals
Share your experiences in the
|