|
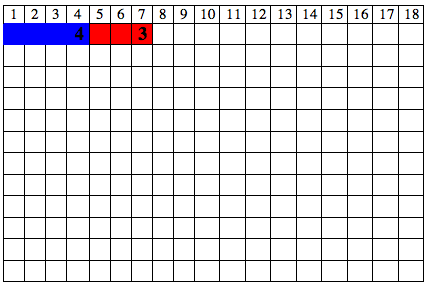
- A board divided into squares (each 2cm x 2cm) across from left to right and 11 squares from top to bottom. The topmost squares are numbered 1 to 18; from 1 to 10 in red and from 11 to 18 are in blue. There is a red line that divides the board vertically, after the number 10.
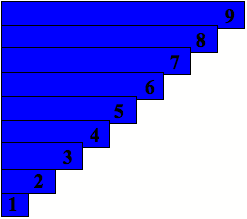
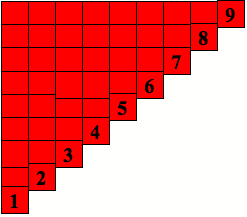
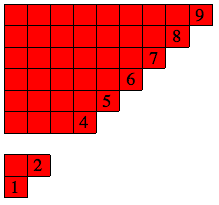
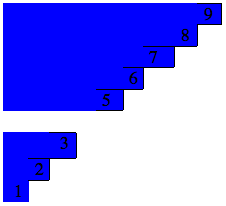
- 2 sets of strips; one set is blue with symbols 1 to 9. The other set is red, which are subdivided into squares by blue lines. The end square of each strip is marked with the symbol that corresponds to the number of its squares.
- Charts 1
- Charts 2
- Have the child bring Chart 1, the two sets of strips, and the board to the table.
- Introduce the child to the board. Show the child the red line which shows us that we have reached ten.
- Show the numbers at the top of the board and tell the child that this is where the answer will be found.
- Show the child the strips you will be using for addition.
- Have the child take out all of the blue strips.
- Have the child place them randomly to the left of the chart.
- Have the child place them in order as shown below:
- Have the child take out the red strips and place them in order to the right of the board, as shown below:
- Have the child choose one blue strip and place it on the first row. (For example the 4 strip)
- You choose a red strip that will not make the number go
- Place it to the right of the blue strip.
|
Table of addition of one
|
4+1=5
4+2=6
4+3=7
4+4=
4+5=
4+6=
4+7=
4+8=
4+9=
|
|
 |
 |
|
- Show the child that 4 plus 3 equals (point to the number on the chart) 7.
- Have the child replace the strips.
- Repeat but now make sure the number is larger than 10.
- Show the child the red line and how this shows us that the number is bigger than ten.
- Have the child replace the strips.
- Show the child the first sheet of paper and tell the child that this is the table of 1.
- Look at the first addition problem: 1 + 1 =
- have the child place the blue 1 strip at the top of the board and the red 1 strip directly next to it.
- Show and say with the child: 1 + 1 = 2
- Have the child fill in 2 for the answer on the paper.
- Have the child replace the material and continue for the whole table of 1.
- Encourage the child to do all of the tables.
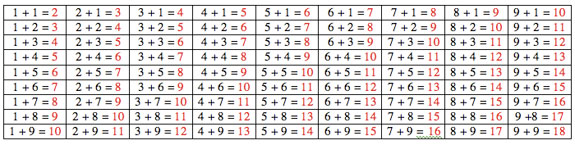
- Once he has done the tables 1 – 9, you can introduce control Chart 1 where the child can check his work.
Be sure you have the child state the combination and say the final result even if he notices the pattern of the answer (2, 3, 4, 5, etc.)
The child can then decorate the pages of tables and make a booklet of the tables.
The child can work as in the presentation on the other tables.
-
Have the child set up the material as in Presentation 1.
- Have the child place a blue five and a red three together.
- Have the child read 5 plus 3 equals 8.
- Have the child then place a blue three and a red five.
- Have the child read 3 plus 5 equals 8.
- Discuss with the child which color comes first in the first equation and which color comes first in the second equation.
- See how even if the order is different, the answer is the same. Say, “So it does not matter what the order is as long as the numbers are the same.”
- Have the child replace the strips.
- Repeat doing a few more with the child.
- Have the child set up the material as in Presentation 1.
- Have the child place the blue 8 strip on the board.
- Take a piece of squared paper and write 8 at the top. Tell the child, “Let’s see what makes 8.”
- Have the child place the blue 1 strip on the board.
- Ask what red strip we will need to make 8.
- The child should then place the red 7 strip next to the blue 1 strip.
- Write on the squared paper 1 + 7 =8 and then read it with the child.
- Have the child place the blue 2 strip on the chart. He should then place the red 6 strip next to the blue 2 strip.
- Record and read as before.
- Repeat for as many combinations you can make to equal 8.
- Tell the child that we are now going to look to see if there are any that are the same. Such as 7 + 1 and 1 + 7, etc.
- Place one set of each of the same combinations to the bottom of the board. As you remove each one, cross it off the paper and explain to the child why you do so.
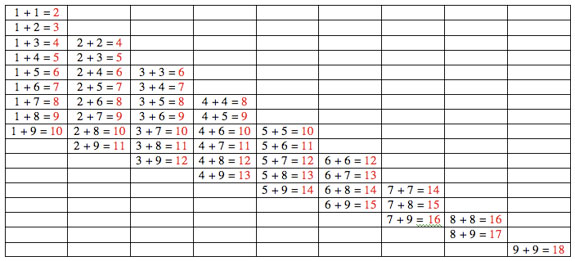
- The child can then check his work on the addition Chart 2.
To lead the child through all the possible combination in addition. None exist beyond the combination of 9 + 9. The red line vertically dividing the board show up when the addition reaches beyond 10 e.g. in the case of 8 (red) added to 5 (blue), the red line tells us how many went to make up the 10 and how many there are extra and above 10.
It has the same purpose as the little counting cards placed at every ten in the snake game. The red line, similarly to the counting card, teaches us how numbers are split into two sections; one section is for the purpose of completely 10, the other section is the remainder and brings us that much further towards completing another 10. This is the mechanism of addition that must be learned.
The child checks the work with Charts 1 and 2.
5 1/2 - 6 years
|